5 Safety
5.1 Hypothermia / Hyperthermia
5.1.1 Hypothermia
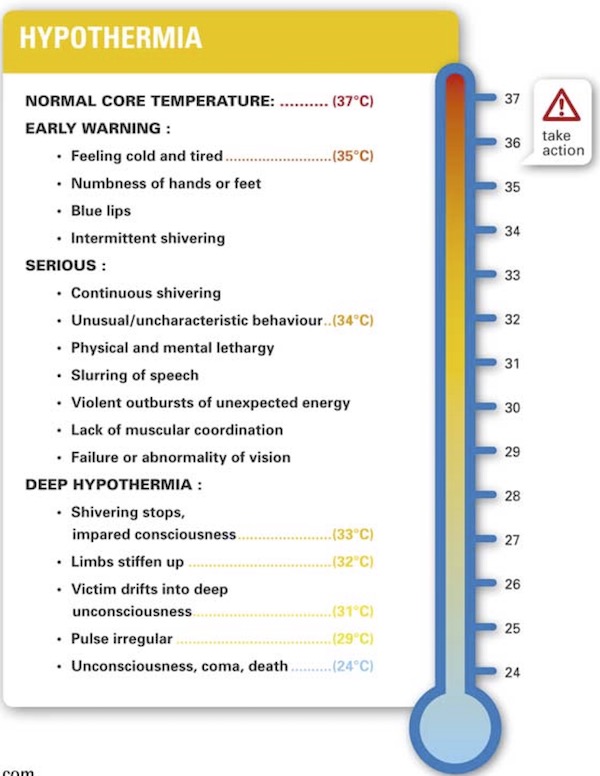
Hypothermia is a condition brought about by the lowering of the body’s core temperature. It can badly affect judgement and be very dangerous. The diagram below shows typical symptoms against core body temperature.
The best approach is avoid becoming hypothermic:
- Avoid swimming
- Maintain personal fitness
- Eat well before paddling
- Wear suitable clothing
- Look after each other, watch out for early signs
- Be flexible in plannin
- Be aware that if one person is getting cold, the rest of the group probably are as well
It is useful to distinguish types of hypothermia by the speed on onset, although in reality these lie in a spectrum and both can occur together:
Immersion hypothermia occurs quickly following submersion in cold water. If the victim can be re-warmed effectively, they are likely to recover rapidly and can then continue.
Exhaustion hypothermia which sets in over a longer period and will involve depletion of energy, meaning the victim can become unfit to continue.
Early stage hypothermia is treated by:
Preventing further use of energy
Preventing further heat loss - e.g. more clothes, shelter, sleeping bag
Slowly rewarm, ideally with warm moist air. This can be done effectively in a group shelter. In a tent or hut, a pot of boiling water on a stove can help
Encourage victim to eat
Serious hypothermia is treated in the same way, but will require hospital treatment and potentially a very difficult evacuation (stretcher).
Especially for more serious cases, attempts to rewarm the skin by hot objects or rubbing can be counterproductive as they may cause blood to flow from the core to peripheral vessels.
For those wanting to learn more, the classic (20 minute) video ‘Cold, Wet and Alive’ is worth watching. Although long and somewhat dated, it’s a realistic portrait of the downward spiral that can set in when things start going wrong in chilly conditions.
5.1.2 Hyperthermia
Hyperthermia describes a range of medical conditions caused by hot weather. The table provides a brief summary. Like hypothermia, avoidance is the best tactic - drink lots, dress for the conditions, wear suncream, sun hat and sunglassees and use seawater to keep cool if it’s really hot.
| Condition | Symptoms | Treatment |
|---|---|---|
| Dehydration | Dry mouth, headache, dizziness, dark urine, cramp | Drink plenty of fluids |
| Sunburn | Red skin, blistering | Cover skin, cool skin by dabbing with water, drink fluids |
| Heat exhaustion | Headaches, dizziness, confusion, nausea, sweating with clammy skin, cramps, rapid weak pulse and breathing | Cool casualty down, give plenty to drink, ideally with oral re-hydration salts. Monitor carefully for signs of heatstroke. |
| Heatstroke | Can follow heat exhaustion, when the body’s thermostat fails and sweating ceases. Symptoms as heat exhaustion, but skin is now hot, flushed and dry, pulse is full and bounding and core temperature rises. | Cool casualty with wet clothes or sheets. Get medical help (e.g calling 999). Monitor carefully. |
5.2 Summoning outside help
The UK Coastguard exists to safeguard people on the sea around the UK, including sea kayakers. It is a good idea to inform them of your plans before setting out. This can be done:
By phone - look up the number of the coastguard station that covers the area
By VHF radio, if you have a license
Using the new RYA SafeTrx App, which also enables you to register your details
If you tell the Coastguard of your plans, ensure that you inform them once you are off the water.
If something does go wrong, sea kayakers need to be able to summon assistance. A variety of methods are available, summarized in the table below. In practice, it is sensible to have a range of options:
| Method | Advantages | Disadvantages |
|---|---|---|
| Mobile Phone | Most people already have one and are familiar with its operation. Call 999 and ask for ‘Coastguard’. | Typically not waterproof. Poor signal in many sea kayaking areas. |
| VHF Radio | Allows two-way communication with rescue services. Transmission may be picked up by other vessels. | Requires at least a basic understanding of radio use and protocols. Handheld VHFs have limited range. |
| Personal locator beacon (PLB) | Simple to use. Satellite communication ensures that transmission will most likely be picked up from any location. Modern units transmit precise location. | No two-way communication. Unit has only one use, is still somewhat expensive and needs occasional battery checks. |
| Rocket flares | Red flares are a widely recognised signal of distress | Relies on someone seeing the flare and reporting it. Flares are quite dangerous to use. They have a limited lifetime before requiring replacement. |
After carrying them for years, I’m recently given up on flares. They’re a pain to keep in date and dispose of, and they can be very dangerous to use. They rely on someone seeing and reporting the flare, and seem to offer no advantages over more modern methods.
I would advise anyone planning their own trips to buy a PLB. They’re small, simple and should work everywhere. VHF radios are useful, but spend your money on a waterproof phone case and a PLB first.
As well as having a means to call for help, kayakers also need to able to pinpoint their location for rescue services, who may be searching a large area. Options include:
| Method | Advantages | Disadvantages |
|---|---|---|
| Handheld flares | Extremely bright and distinctive, compared to any other method. Produce enough smoke to provide a wind indication to a helicopter. | Flares are quite dangerous to use. They have a limited lifetime before requiring replacement. |
| Smoke flares | Provide a wind indication to a helicopter. | Useless in the dark. Smoke tends to stay low and disperse in high winds. Somewhat dangerous, but less so than flares. |
| Lights and strobes | Simple and compact - dedicated marine units are available, but some tests have shown that even bike lights can be effective. | Not as bright or distinctive as flares. Depend on a waterproof unit with charged batteries. |
| Laser lights | Very compact, capable of producing a bright and distinctive flash if used correctly. | Needs to be carefully aimed. Requires charged batteries. |
| VHF radio | Can be used to pinpoint location using direction finding equipment on lifeboats and helicopters. Also enables 2-way communication to describe location. | Requires charged batteries. Useful to have some knowledge of radio protocol. |
| Bright and reflective equipment | Simple and easy to achieve. Reflective ‘SOLAS’ tape can be remarkably effective under searchlights at night. | Not as distinctive over long ranges as lights. Decent ‘SOLAS’ tape is a little more expensive than alternatives, but much more effective. |
I think there’s a stronger argument for handheld flares than rocket flares, but I gave up on carrying these recently in favor of strobes that last a great deal longer, are a lot safer and don’t require regular replacement. If you do ever use a handheld flare, hold it horizontally to reduce the amount of burning material that falls on your hands. Smoke flares have a very narrow range of uses, and I’ve never carried one.
I do carry all of the non-pyrotechnic options in the list above. Having many lights makes sense - they’re compact things. VHF radios are generally useful to have. Buying bright kit and sticking reflective ‘SOLAS’ tape all over your boat and paddles makes a lot of sense.
5.3 Coastal Navigation
The simplest approach to coastal navigation is simply to follow a linear feature (like a coastline) and know how far along this we are by the things that we have passed.
What landmarks would we expect to see on a paddle from Portloo to Old Town?
Paddling out of Portloo, turn left around a rocky area (island at HW). Pass a small beach, a rocky promontory, a second beach and a lifeboat station. Paddle past the town beach and round the pier. Pass a small island, turning left. Pass a point and turn left again. Left again at a point with a beacon offshore. Sharp left inside some islands into a beach with buildings behind. Back out of this bay, past an indent (island) to a major headland (lighthouse). Round the headland, offshore island, smaller headland and into Old town bay (look for main road and the town).
The Ordnance Survey, who create maps for the UK, have lots of resources on map reading that you might find useful.
5.4 Other water users
We often share the sea with other types of craft. Some of them, especially swimmers, are more vulnerable than us, and need to be looked out for, especially in surf. Mostly, we need to be aware of other craft, make ourselves visible by traveling in groups, and take avoiding action where necessary.
Large vessels can be a hazard in some areas that we paddle in. They travel remarkably fast, and are often unable to maneuver to avoid things due to their size, or because they’re travelling in a narrow deep water channel. Clearly, kayakers need to keep out of the way. It’s worth understanding a little about the navigational marks that large vessels use so that we can understand where they are likely to go.
5.4.1 Navigational marks
To assist the navigation of ships, navigational marks such as lighthouses, buoys and beacons are placed around the coastline. Because kayaks can operate in very shallow water, these aren’t relevant to us in the way as for large vessels. However, they do provide useful landmarks if you’re carrying the nautical chart. A basic understanding of what the main buoys mean will help you understand where larger vessels are likely to go and thus help you avoid them.
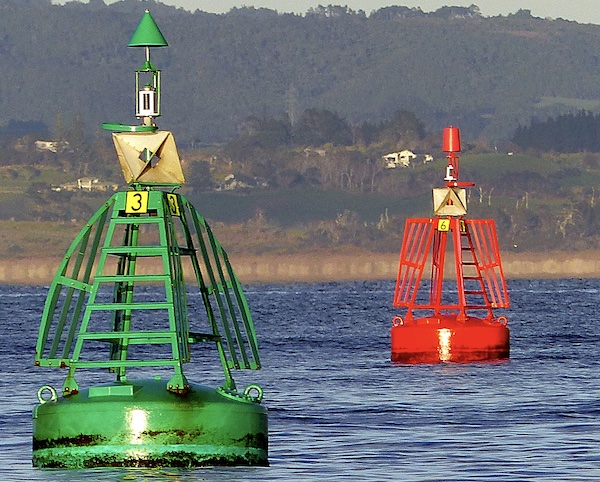
Lateral marks are used to mark the edges of shipping channels – for example into and out of a harbor. As a big ship enters a harbor, red can-shaped port-hand buoys will be on the left, whilst green conical starboard-hand buoys will be on the right.
A mnemonic to remember this is “no more cans of red port left”.
This is the system known as ‘IALA A’, used in the UK and many other parts of the world. Some areas, notably the US, use ‘IALA B’, in which the colors of the buoys, but not the shapes, are reversed.
Cardinal marks indicate the presence of hazards – normally shallows that big vessels would rather avoid. A cardinal mark indicates the direction from the mark in which safe water can be found. For example, safe deep water will be found to the north of a north cardinal buoy, with the hazard lying to the south. The marks are differentiated by the orientation of two cones at the top as well as the sequence of black and yellow colors on the buoy, as shown in the diagram.
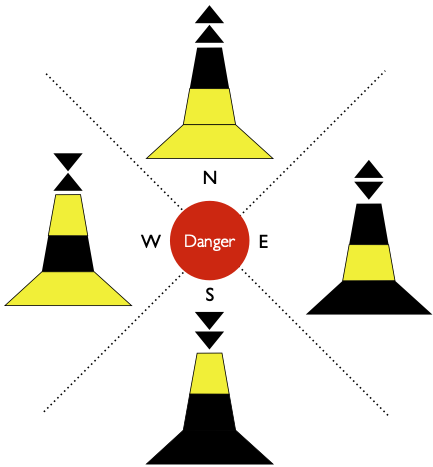
Because cardinal marks indicate shallow areas, they can sometimes be posts attached to the seabed rather than floating buoys.
The buoy in the image below is an west cardinal mark, indicating shallows to the east.

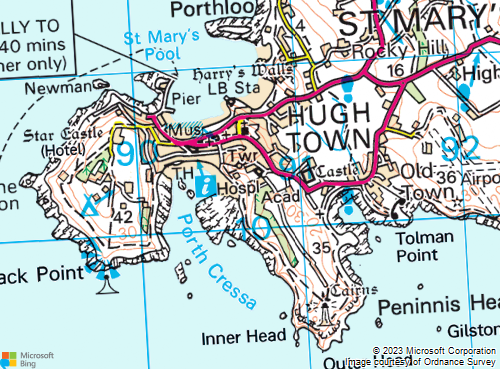
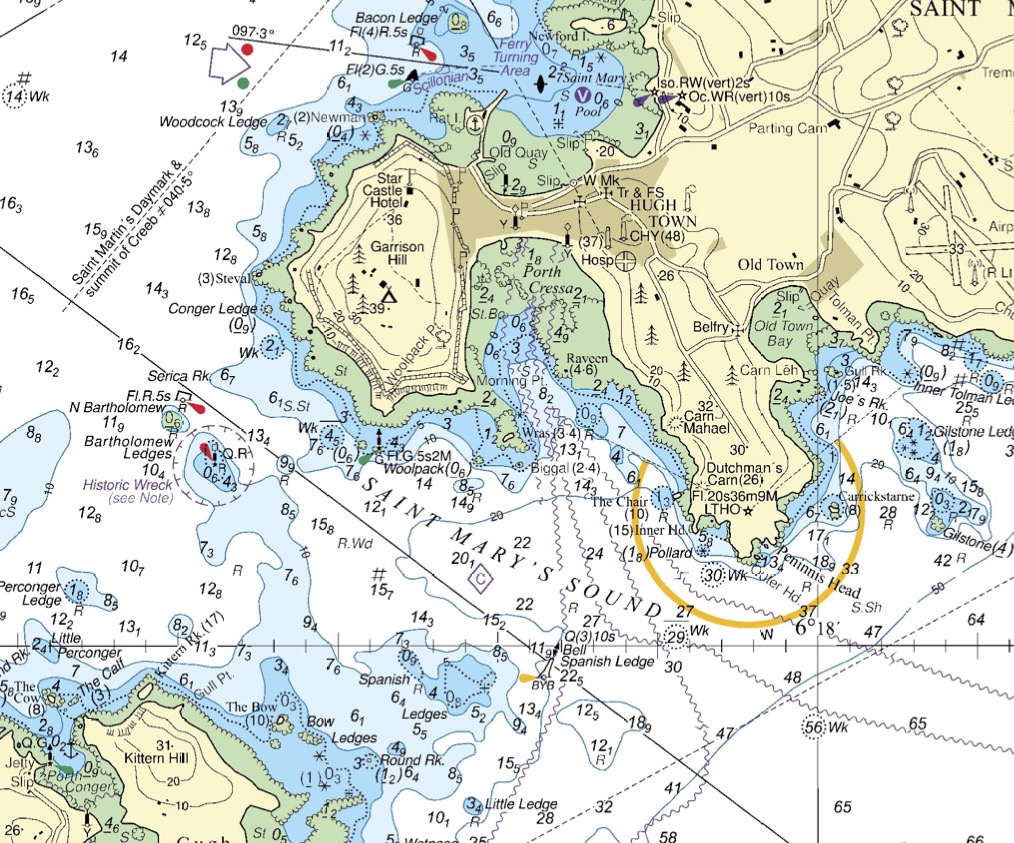
The chart extract below shows an example of how navigational marks might be positioned:
As sea kayakers, the hazards (e.g. shallows) indicated by lateral and cardinal buoys aren’t an issue for us. It’s often better to go the ‘wrong’ side to keep out the way of big vessels.
For example, imagine that we’re crossing Saint Mary’s Sound (see chart above) from Kittern Rock to the western corner of Garrison Hill. We’ll use bearings and transits to keep on course, but the red post and buoy that mark the Bartholomew ledges will be useful landmarks along our way.
As we get close to the post and buoy, we notice the ‘Scillonian’ - a 68 meter long ferry - coming around the headland of Garrison Hill. It looks like it’ll head to our right.
However, consulting the chart, we notice that the main shipping channel passes to the north-east of the Bartholomew ledges buoy - we can see the course marked with a line on the chart, and we know that the channel must go between the red Bartholomew ledges buoy and the green ‘Woolpack’ mark.
It is possible, but unlikely, that the ferry will go the south-west of the Bartholomew ledges. However, it certainly won’t go through the middle of the very shallow ledges marked by the red buoy and post. The safest place to be is close to these lateral marks - ideally between the N Bartholomew buoy and the post.
So, we paddle the short distance across to the N Bartholomew buoy and pause our crossing, taking advantage of a slight eddy forming over the shallows so we don’t need to paddle too hard into the tidal stream to hold our position. We watch the Scillonian turn. For a scary moment it points directly towards us, but it keeps turning, and soon passes to the east of us.
Chart © Crown Copyright and/or database rights. NOT FOR NAVIGATION. Reproduced by permission of the Controller of Her Majesty’s Stationery Office and the UK Hydrographic Office (www.GOV.uk/UKHO)
5.5 Group communication
Operating as a group is one of the main ways that we enhance our safety on the sea. However, it’s not enough for everyone to launch at the same time - the group needs to work in a cohesive and supportive way.
Clearly, the group can only operate effectively if everyone stays together. There’s a compromise, especially in challenging conditions, between staying close and giving each group member enough space to manoeuvre. This limits the size of effective groups at a more advanced level.
The group must communicate effectively both before and during its time on the water. Given it is easier to communicate on land, it make sense to review plans, roles, potential hazards and options before launching. On the water, the team takes advantage of quiet spots to chat and re-evaluate its options. When possible, the team paddles close enough together to hold a conversation.
A group can only work effectively if group members can see each other. This can become challenging among rock gardens. It helps if group members move so that they can see each other and can be seen by others.
It is easier to avoid trouble than to sort out problems after they occur. The group should be proactive in identifying hazards, decide what challenges it wants to take on, and formulate plans that enable progressive exposure to conditions and an opportunity to retreat. For example, the group might choose to launch in a river mouth and paddle upwind rather than beginning the day by paddling downwind and offshore.
5.6 Towing
There are several reasons why we might want to tow other members of our group:
| Reason to tow | Likely towing technique |
|---|---|
| We might need to move a frightened or unsteady paddler out of challenging conditions | Contact tow |
| Someone may have become fatigued at the end of a long day - towing can help keep the group together at a good speed, with the tired paddler continuing to paddle as much as they are able | Towline |
| We may need to move a paddler incapacitated by (e.g.) injury or seasickness back to safety | Rafted tow |
| We might need to keep other paddlers who are performing rescues away from rocks | (we likely won’t cover these more advanced techniques on this course) |
Let’s look at each technique in a little more detail
5.6.1 Contact tows
This is a simple approach to towing, using little or no equipment, to move other paddlers a short distance. In the simplest embodiment, the paddler being towed simply holds onto the rescuer’s decklines whilst they paddle them to safety. As well as providing a connection for the tow, holding the rescuer’s boat provides stability and reassurance.
Some paddlers use short lengths of cord clipped to their decklines as simple aids to contact towing.
This short video covers both approaches:
5.6.2 Using the towline
A towline (Peak, 15m) is shown in the image below:

This towline is worn around the paddler’s waist, just above the spraydeck. A quick release buckle is used to secure the towline around the waist. Pulling the yellow ball releases the towline.
The line is kept inside a zipped bag when not in use. The line is attached to the waist strap by a black shock absorber, which stretches to reduce the peak forces transmitted to the paddler’s body. This makes towing more comfortable, especially in waves.
The line is ‘chain linked’ to reduce it’s length from 15 meters to around 5 meters. This is a good length for many towing scenarios - keeping the paddler being towed close to you reduces the amount that the towed boat can wander around. A metal clip can be used to undo the chain linking to increase the towline length to 15 meters. This is useful if towing downwind in sizable waves to avoid the towed paddler crashing into the back of your boat.
The end of the towline has a section of non-chain-linked line for use in rafted tows and a float to stop the karabiner sinking. This towline has been retrofitted with a Whetman Kraken karabiner - these karabiners are easy to clip onto decklines, strong and corrosion resistant.
It’s worth thinking about how and where to clip the towline on. We typically clip to the boat’s decklines, as these are the strongest attachment points. It’s better to clip the karabiner with the gate facing up rather than down, as this reduces its propensity to unclip itself.

5.6.3 Rafted tows
A paddler incapacitated by injury (e.g. shoulder dislocation) or seasickness may not be stable enough to be towed alone. Instead, we raft the incapacitated paddler up with another group member, who can hold them upright and keep an eye on them. The towline is passed under the assistant’s decklines and clipped onto the victim’s decklines. This arrangement enables the assistant to slide forward to unclip the tow if needed.

Towing a raft of two boats any distance is clearly going to be hard work, and it may make sense to involve another paddler in the tow. The simplest approach is for the second towing paddler to clip onto the front of the first towing paddler’s boat, so that the boats are all towed inline.
